Friday, December 10, 2010

Execute Scripts from a folder using Powershell

For last few days I am kinda got wired up with Powershell and trying to do whatever I used to do otherwise using SQL PowerShell e.g. other day we had some 40 odd scripts to be deployed on our database so I worte a simple 2 liner SQL PS script which would go and execute each script one by one.

1. To illustrate I have 3 Scripts in a folder called ScritpsFolder to create 3 Stored Procedures
2. Script inside sp_A


3. Now the Powershell code to execute scripts from the folder.

ForEach ($S In Gci -Path "C:\ScriptsFolder\" -Fliter *.sql | Sort-Object Name )
{
Invoke-SqlCmd -InputFile $S.FullName
}


a) ForEach : will iterate on each item insire $S.
b) Gci (Get-Child Item): will get all the filenames from given path and will store in variable $S.
c) Invoke-SqlCmd: will take the script and run it on the Database.


To run the script you should be in context of your SQL Server/Database and particular database if it not defined in the script.

4. Check the SPs created in the database

Wednesday, December 01, 2010

Execution Tree in SSIS

I have been asked many times, the way we can see Execution Query Plan for Queries in SSMS, Can we see something similar in  SSIS too. Well YES WE CAN, it wont give you factors like I/O, CPU or SubTree Cost but will give you fair idea of path and buffers SSIS engine will create to do the DATA FLOW.

At run time Data Flow Engine divides the Data Flow Task operations into Execution Trees which demonstrate how package uses buffers and threads. These execution trees specify how buffers and threads are allocated in the package.

Each tree creates a new buffer and may execute on a different thread. When a new buffer is created such as when a partially blocking or blocking transformation is added to the pipeline, additional memory is required to handle the data transformation; however, it is important to note that each new tree may also give you additional worker thread.[TechNet]

Let's take an example to show the Execution Tree in the Data Flow Task. I will create a simple Data Flow Task and have two flows in it.

1) Direct transfer of data from SrcEmployee table to DestEmployee table.
2) SrcDepartment to DestDepartment by having one Sort Component in between to sort on DepName.


To see Execution Tree log you will have enable build-in logging and to see log entries add Log Event window from View>OtherWindows.

Now when you run package, SSIS will log an entry for User:PipelineExecutionTrees which discribes the Trees/paths SSIS has created to run the Package.


Message:

Begin Path 0 [Tree 1]
   output "OLE DB Source Output" (11); component "SrcEmployee" (1)
   input "OLE DB Destination Input" (29); component "DestEmployee" (16)
End Path 0

Begin Path 1 [Tree 2]
   output "OLE DB Source Output" (124); component "SrcDepartment" (114)
   input "Sort Input" (147); component "SortDepartment" (146)
End Path 1

Begin Path 2 [Tree 3]
   output "Sort Output" (148); component "SortDepartment" (146)
   input "OLE DB Destination Input" (142); component "DestDepartment" (129)
End Path 2


Happy Extraction and Inception!!

Tuesday, November 16, 2010

MERGE Statement in SQL SERVER 2008

SQL SERVER 2008 has introduced MERGE statement which is very helpful in synchronizing two tables.We can perform INSERT, UPDATE, or DELETE operations on target table based on the result of the join with the source table.


Well Syntax for MERGE is very complex so I will use a very simple example where I will create two table SOURCE  and TARGET and then perform insert, update and delete on SOURCE table and then synchronize TARGET table using MERGE Statement.


1. Lets create two tables Source and Target with same schema and data and after updates in Source we will sync it with Target table.


 CREATE TABLE SOURCE
(
ID INTEGER,
Name VARCHAR(50),
);
GO
INSERT INTO SOURCE
( ID, Name)
VALUES
(1, 'Rahul'),
(2, 'Mark'),
(3, 'Jen');

 SELECT *  INTO TARGET FROM SOURCE;


2. Lets modify data in Source table ( Delete , update and Insert new record).

DELETE FROM SOURCE
    WHERE ID =2;
--Update in source
UPDATE Source
    SET Name = 'Jason'
WHERE Id = 3;

-- new record in source
INSERT INTO SOURCE
    (ID, Name)
VALUES
    (4, 'Antonia');


3. Now comes the MERGE Statement
Source table will be joined with Target table on ID and then WHEN clause is used to identify type of changes
a.Update: Where both ID match but other columns doesnt match.
MATCHED and Target.Name <> Source.Name
b. New/Inserts: When IDs are not matched by Target
c. Deletes: When IDs are not matched by Source.


MERGE INTO TARGET
USING (SELECT * from Source) AS SOURCE
ON Target.ID = Source.ID
WHEN -- upadate
    MATCHED and Target.Name <> Source.Name THEN
        UPDATE
        SET Name = SOURCE.Name
WHEN -- new record in source
    NOT MATCHED BY TARGET THEN
        INSERT  ( ID ,Name)
        VALUES ( Source.ID,Source.Name)
WHEN --records deleted in source
    NOT MATCHED BY SOURCE THEN
        DELETE
--see action
OUTPUT $action
    , Inserted.ID AS InsertedID
    , Inserted.NAME AS InsertedName
    , Deleted.ID AS DeletedID
    , Deleted.Name AS DeletedName;


I have used an OUTPUT to see operations performed by MERGE Statement.


4. Tables after MERGE


Happy Coding!!

Monday, August 30, 2010

Script Out Database objects using PowerShell

PowerShell is a very powerful tool and sometimes provide an amazing way for accomplishing which otherwise would have taken lot of effort and time.. One such scenario I had recently when I had to script out few stored procedure from my SQL Sever Database. There we go.. Below I will explain how we can script out Database Objects using PowerShell.

Lets get rolling and start PowerShell-  We start PowerShell directly from SSMS by Right clicking any node and select Start PowerShell. It will open PowerShell connected to your Server

I will script Stored Procedures from the Database and I will show various options of doing that.
First let get down to Stored Procedures


1. First thing first .. let try to display our Stored Procedure on Screen
gci *uspGetAllNodes* | %{$_.Script()}


2. Displaying it on Screen doesnt help much, lets Sript-Out this in a file
gci *uspGetAllNodes* | %{$_.Script()} | Out-File c:\Scripts\uspGetAllNodes.sql
 

3. Thats cool we can get one Stored Procedure, how about getting all the StoredProcedures
gci  | %{$_.Script()} | Out-File c:\Scripts\AllStoredProcs.txt


4. Great, but what if I have few Stored procedures to extract and I dont what to run the script again and again.
Use an Array Variable.
$SPNameList = @("uspGetAllNodes", "uspGetAllPaths")
FOREACH ( $SP in $SPNameList)
{
gci *$SP* | %{$_.Script()} | out-file c:\Scripts\$SP.sql
}


5. OutPut Directory


Thanks!!

Sunday, August 22, 2010

Data from Dynamic Sheets of an Excel

This is with reference to a Question asked on the blog:
Question:
How to get data from different sheets in an Excel WorkBook  having same column names?

Solutions:
Basic idea to get the done is get name of all the sheets in an variable and then iterate over that variable and get data from respective Sheet.

To Demonstrate I have created an Excel sheet having 3 sheets having only one column "ColumnName"
1. Excel WorkBook

2. Now lets create the package with below variables

3. Variable QueryStmt will hold a dynamic value which would be used as SQL Command passed to Excel.
Check EvaluateAsExpression Property as True and set Expression as

4a. Next Step is to use Script Task to get all the sheet names in Variable SheetNamesList.

4b. Write below code in Script Task to get all the sheets names in SheetNamesList Variable.
Directive needed using System.Data.OleDb;
        public void Main()

        {

            OleDbConnection con = null;

            System.Data.DataTable dt = null;

            string ExlPath = Dts.Variables["ExcelPath"].Value.ToString();


            String conStr = "Provider=Microsoft.Jet.OLEDB.4.0;" +

                "Data Source=" + ExlPath + ";Extended Properties=Excel 8.0;";

            con = new OleDbConnection(conStr);

            con.Open();

            dt = con.GetOleDbSchemaTable(OleDbSchemaGuid.Tables, null);


            String[] excelSheetNames = new String[dt.Rows.Count];

            int i = 0;


            foreach (DataRow row in dt.Rows)

            {

                excelSheetNames[i] = row["TABLE_NAME"].ToString();

                i++;

            }


            Dts.Variables["SheetNameList"].Value = excelSheetNames;


            // TODO: Add your code here

            Dts.TaskResult = (int)ScriptResults.Success;
}
5  Create a For Each Loop to iterate over SheetNameList
a.

b. Set the index to SheetName to get counter sheet name


6. Add a DATA FLOW TASK and use Excel Source to connect to the WorkBook and Set the properties as


7. Thats it.. Execute the package and get the data...


Thanks!!

Sunday, August 15, 2010

Drop-Down/ComboBox Sorting in SSRS

For Dynamic Sorting SSRS has Interactive Sorting  which enables a sorting button on the Tablix Column and user can sort on desired Column but many time user wants to have Drop-Down or Combo Box listing columns and wish to chose the sorting column from there.. Something like


Okay , this is not built-in feature of SSRS but we can certainly work around and provide that feature... I will take a simple example to demonstrate that: I will create a Simple Student table and provide drop down sorting on the columns in the table.
So Lets get started 
1. Create a Student table

2. Create a SSRS project and create a Shared DataSource linking our Database

3. Create a simple report having columns from Student table

4. Report would look like.

5a. Now lets start our work and create a parameter SortBy


5b. Specify Available values as Column name from the Student table and assign values to them

6. Go to Tablix Properties> Sorting


7.Add a sorting Option and in Column tab give expression as
=IIf(Parameters!SortBy.Value=1,Fields!StudentID.Value
,IIf(Parameters!SortBy.Value=2,Fields!Name.Value
,Fields!Marks.Value))

8. Run the report and chose the SortBy column from Drop-Down
a. By Name

b.By Marks


Cheers-Have fun!!
Rahul Sherawat


Monday, May 31, 2010

Create Custom Task in SSIS

Microsoft fitted SSIS with rich set of Tasks and Transformation that an ETL developer would need but sometime you have a requirment which you feel better done in some othere way so SSIS allows you to create Custom task and include it in SSIS.

Whenever any tricky situation comes my boss would say "Why dont you do this with Custom Task or Create package programtically" and I used to think if there is something that cant be done using existing tasks and transformation then perphaps the work doesnt worth doing with SSIS or I dont worth working on SSIS.

Well than one night( wonder why developers always have night rather than day) I thought lets do something programatically.

SSIS allows to have 5 types of custom objects
  • Custom tasks.
  • Custom connection managers
  • Custom log providers
  • Custom enumerators
  • Custom data flow components

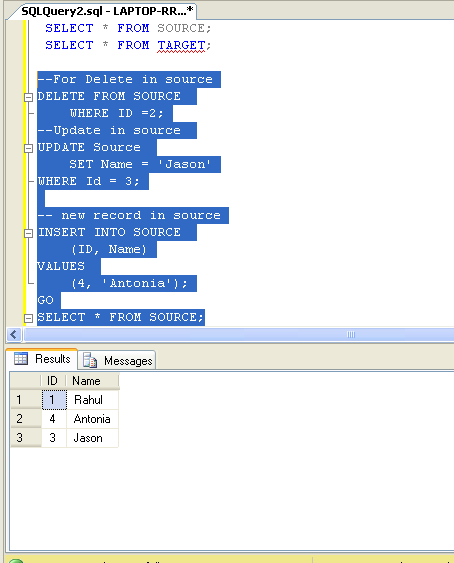
I will create a Custom Task in this post. Most common thing when I debug a SSIS pacakage is to know the value of a variable so I created a custom task to display value of a select variable in a message box ( can do it in script task but isnt it a pain to do such a simple thing there). So lets create a "Display Variable" task.

It is best practice to create two assemblies: one for UI and anothter for actual runtime processing code.
First lets start with UI of DisplayVariable
A1. Create a Class Library project
A2. Add reference to
  1.     System.Drawing
  2.     System.Windows.Forms
  3.     Microsoft.DataTransformationServices.Controls -- This doesnt show up in .Net tab so you can browse to C:\Windows\Assembly to add
  4.     Microsoft.SqlServer.Dts.Design

A3. DisplayVariableForm:
Add a Windows Form ( name as DisplayVariableForm) then add one comboBox (CmBxVariableList ) and a Button( butOK)


A4. Code for DisplayVariableFormUI.cs

using System;
using System.Collections.Generic;
using System.ComponentModel;
using System.Data;
using System.Drawing;
using System.Linq;
using System.Text;
using System.Windows.Forms;
using Microsoft.SqlServer.Dts.Runtime;
using Microsoft.SqlServer.Dts.Runtime.Design;

namespace DisplayVariableUI
{
    public partial class DisplayVariableForm : Form
    {
        private TaskHost vTaskHost;
        private Connections vConnection;
        const string VARIABLE_NAME = "VariableName";
        const string VARIABLE_VALUE = "VariableValue";
     
        public DisplayVariableForm(TaskHost taskHost, Connections connections)
        {
            vTaskHost = taskHost;
            vConnection = connections;
            InitializeComponent();
        }
        //Fill Variable combo
        private void DisplayVariableForm_Load(object sender, EventArgs e)
        {
            CmBxVariableList.BeginUpdate();
            foreach (Variable var in vTaskHost.Variables)
            {
                CmBxVariableList.Items.Add(var.QualifiedName);
            }
            CmBxVariableList.EndUpdate();
        }
       
        private void butOK_Click(object sender, EventArgs e)
        {
            VariableName = CmBxVariableList.Text;
            VariableValue = vTaskHost.Variables[VariableName].Value.ToString();
            DialogResult = DialogResult.OK;
        }
        //get variable name
        private string VariableName
        {
            get
            {
                if (vTaskHost.Properties[VARIABLE_NAME].GetValue(vTaskHost) != null)
                {
                  return vTaskHost.Properties[VARIABLE_NAME].GetValue(vTaskHost).ToString();
                }
                return null;
            }
            set
            {
                vTaskHost.Properties[VARIABLE_NAME].SetValue(vTaskHost, value);
            }
        }
        //Get variable value
        private string VariableValue
        {
            get
            {
                if (vTaskHost.Properties[VARIABLE_VALUE].GetValue(vTaskHost) != null)
                {
                  return vTaskHost.Properties[VARIABLE_VALUE].GetValue(vTaskHost).ToString();
                }
                return null;
            }
            set
            {
                vTaskHost.Properties[VARIABLE_VALUE].SetValue(vTaskHost, value);
            }
        }
    }
}

A5.  DisplayVariableUI.cs:

To initialize and display the user interface associated with the task we will create a class DisplayVariableUI.cs which will be inherited from interface IDtsTaskUI. When the user interface for a task is invoked, the designer calls the Initialize method, implemented by the task user interface and then provides the TaskHost and Connections collections of the task and package, respectively, as parameters. These collections are stored locally, and used subsequently in the GetView method.

The designer calls the GetView method to request the window that is displayed in SSIS Designer. The task creates an instance of the window that contains the user interface for the task, and returns the user interface to the designer for display. Typically, the TaskHost and Connections objects are provided to the window through an overloaded constructor so they can be used to configure the task.

The SSIS Designer calls the GetView method of the task UI to display the user interface for the task. The task user interface returns the Windows form from this method, and SSIS Designer shows this form as a modal dialog box.

When the form is closed, SSIS Designer examines the value of the DialogResult property of the form to determine whether the task has been modified and if these modifications should be saved. If the value of the DialogResult property is OK, the SSIS Designer calls the persistence methods of the task to save the changes; otherwise, the changes are discarded.

using System;
using System.Collections.Generic;
using System.Linq;
using System.Text;
using System.Windows.Forms;
using Microsoft.SqlServer.Dts.Runtime;
using Microsoft.SqlServer.Dts.Runtime.Design;

namespace DisplayVariableUI
{
    public class DisplayVariableUI : IDtsTaskUI
    {
        private TaskHost taskHost;
        private Connections connectionService;

        public void Initialize(TaskHost taskHost, IServiceProvider serviceProvider)
        {
            this.taskHost = taskHost;
            IDtsConnectionService cs = serviceProvider.GetService (typeof(IDtsConnectionService)) as IDtsConnectionService;
            this.connectionService = cs.GetConnections();

        }
        public ContainerControl GetView()
        {
            return new DisplayVariableForm(this.taskHost, this.connectionService);
        }
        public void Delete(IWin32Window parentWindow)
        {
        }
        public void New(IWin32Window parentWindow)
        {
        }
    }
}


A6. Now UI code is complete and we have to sign assembly with strong name so go to Properties >> Signing and sign the assembly using a StrongName.


 A7. Build DisplayVariableUI

A8. We will need public key token of DisplayVariableUI assembly in Task project. To create Public key token Open Visual Studio 2008 command prompt , browse to the project folder where strongkey should be created and type
 a. sn -p DisplayVariableUIPrivateKey.snk DisplayVariableUIPublicKey.snk

To see the Public key token
 b. sn -t DisplayVariableUIPublicKey.snk
Copy the Public Key token

Now we move to Task code with actual runtime code is written:

B1. Create a Class Library project ( DisplayVariable.cs)

B2. Add reference to
  1.     System.Windows.Forms
  2.     Microsoft.DataTransformationServices.Controls
    -- This doesnt show up in .Net tab so you can browse to C:\Windows\Assembly to add

B3. Code for DisplayVariable.cs
 a. Apply the DtsTaskAttribute attribute to the class, this attribute provides design-time information such as the name, description, and task type of the task. we will need to specify PublicKeyToken of UI here.

 b. DisplayVariable class should inherit from Task Class and then override Base Task class DTSExecResult Execute method to show a message box cantaining Variable name and Variable value.

using System;
using System.Collections.Generic;
using System.Linq;
using System.Text;
using Microsoft.SqlServer.Dts.Runtime;

namespace DisplayVariable
{
    [DtsTask
    (
    DisplayName = "DisplayVariable",
    Description = "Task can display any variable from Variable List",
    RequiredProductLevel = DTSProductLevel.None,
    TaskContact = "Rahul Sherawat-logtorahul@gmail.com",
    UITypeName = "DisplayVariableUI.DisplayVariableUI, DisplayVariableUI, Version=1.0.0.0, Culture=Neutral, PublicKeyToken=6d67e5bed27edc4b"
    )
    ]

    public class DisplayVariable: Task
    {
        //will get Variable Name
        private string UIvariableName;
        public string VariableName
        {
            get { return UIvariableName; }
            set { UIvariableName = value; }
        }
        //will get variable value
        private string UIVariableValue;
        public string VariableValue
        {
            get { return UIVariableValue; }
            set { UIVariableValue = value; }

        }
        //override execute
        public override DTSExecResult  Execute(Connections connections, VariableDispenser variableDispenser, IDTSComponentEvents componentEvents, IDTSLogging log, object transaction)
        {
            DTSExecResult execResult = DTSExecResult.Success;

            if (string.IsNullOrEmpty(VariableName))
            {
                System.Windows.Forms.MessageBox.Show("No Variable Selected");
            }
            else
            {
                string VarVal;
                VarVal = VariableName + "\r\n"+ "Value: " + VariableValue;
                System.Windows.Forms.MessageBox.Show(VarVal);
            }
        return execResult;
        }
    }
}

 c. DtsTaskAttribute  attribute PublicKeyToken is the public key token of UI assembly that we will create in next step and this has to updated in Task assembly and rebuild.

B4. DisplayVariable Assembly has to be signed so go to Properties >> Signing and sign the assembly using a StrongName.

B5. Build the project. This will create DisplayVariable.dll in debug folder of project.


C1. Go to DisplayVariableUI project in add reference of DisplayVariable.dll and build the UI project again.

C2. Now both the dll are created and we have to add them to GAC
In Visual Studio Command prompt type
 a. For DisplayVariable.dll
    gacutil -i DisplayVariable.dll
 b. For DisplayVariableUI.dll
    gacutil -i DisplayVariableUI.dll

C3. Copy DisplayVariableUI.dll  and DisplayVariable.dll to \\Program Files\Microsoft SQL Server\100\DTS\Tasks so that it can be picked up in SSIS tool box

C4. Create a new SSIS project. Go to Tools>>Choose ToolBox items..>>SSIS ControlFlow items select DisplayVariable

C5. You should be able to see DisplayVariable Task in ToolBox now.

C6. Drag it to control flow and use it


You can download entire solution from  here

Wednesday, May 19, 2010

Same Connection Manager on Multiple Server

There was a question on MSDN forum to Run same query on Mulitple Servers.

We can do this by using one Connection Manager and passing the Connection String through Expressions
Below are the steps I followed to achieve this


1. Store Connection String for various connection in a table

2. Declare two Varibles like


3.Use Expression of Source Connection Manager to provide Connection String


4. Use Execute Sql Task to get connections in a Varible of type Objects from the table


5. Use For Each Loop to Iterate on that variable

6. Use Script component to cast the value of CurrConnection to String
        public void Main()
        {
            // TODO: Add your code here
            Dts.TaskResult = (int)ScriptResults.Success;
            String con;
            con = (string) Dts.Variables["CurrConnection"].Value;
            Dts.Variables["CurrConnection"].Value = con;
         
        }

7. Use any task inside the for loop with Connection Manager and it will use different server for each loop.

Google Dataset Search

Google's Vision statement  is “ to provide access to the world's information in one click. ” Google’s mission Statement is “ ...